Friday, July 29, 2011

SubText Comments to Disqus

Currently I have a Blog migration task that needs to transfer articles from SubText to Blogger. One of the requirements is using Disqus to handle comment moderation.

Disqus allows importing of comments using WordPress eXtended RSS (WXR) XML file. This is in contrast with SubText because it uses BlogML in exporting blog contents. So the nearest possible way to do is to convert BlogML to WXR.

I find it hard to search for a converter tool until such time I luckily found Dillie-O's Blog Migrator tool. You can download the source code here. It is it capable of converting BlogML XML file to a reliable WXR file.
Since we are importing to Disqus we need to follow its importing format. You can see it here. Do note that all fields are required even they contain no content.

After my first try, I noticed that Blog Migrator tool is lacking of the following tags:

<dsq:thread_identifier></dsq:thread_identifier>
<wp:comment_id></wp:comment_id>
<wp:comment_author_ip></wp:comment_author_ip>

These tags should be present to the WXR file. Since I don't want to waste time to manually add them, I made my hands dirty to Blog Migrator's source code. Here is what I did:

Open the source code and go to Solution Explorer tab.

Open Generator.cs file under the objects folder.

Inside the WriteWXRDocument() function:

Replace the attribute
writer.WriteAttributeString("xmlns", "wfw", null, "http://wellformedweb.org/CommentAPI/");
with
writer.WriteAttributeString("xmlns", "dsq", null, "http://www.disqus.com/");
Insert the code
writer.WriteStartElement("dsq:thread_identifier");
writer.WriteEndElement(); // dsq:thread_identifier
under
writer.WriteCData(currPost.content.Value);
writer.WriteEndElement();
Insert the code
writer.WriteElementString("wp:comment_id", currComment.id);
under
writer.WriteStartElement("wp:comment");
And insert the code
writer.WriteElementString("wp:comment_author_IP", "");
under
writer.WriteElementString("wp:comment_type", " ");
Save the solution and then start debugging (F5).

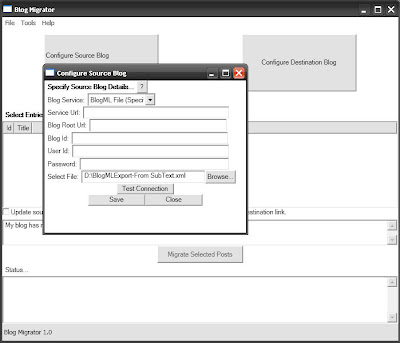
On the Blog Migrator window, configure the source blog. Make sure to select BlogML as the Blog Service and browse the BlogML XML file.

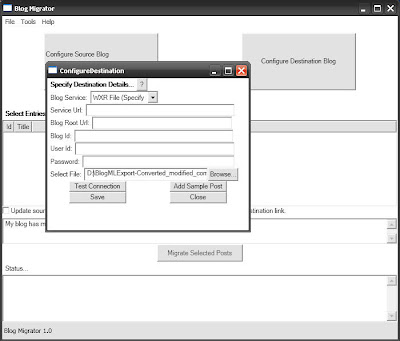
Configure the Destination Blog. Just select WXR File from Blog Service and browse the destination WXR file.

Click the Get Posts from Source button. The articles will then be listed. Click the Select All button.

Now click the Migrate Selected Posts button. Voila! the WXR is created.

Another important thing to note is to set the <dsq:thread_identifier></dsq:thread_identifier> tag. Usually it is the internal identifier of the article but I just leaved it blank so the URL inside the <link></link> tag will be used. If you leave it blank, make sure the url is correctly set so the comments will be properly linked to its articles.

Once you finalize the WXR, you can now log on to Disqus and import the comments using the Generic (WXR) category.

Thanks again Dillie-O for the tool. You saved my day!

Wednesday, July 13, 2011

How to Reset root's Password of MySQL

We've got a problem accessing the MySQL database when someone changes the password of 'root' user and we cannot retrieve it. So, I decided to reset it's password.


This is my setup:
  1. Using Windows Server 2008
  2. MySQL Server 5.1 installed in the default directory, inside the Program Files folder.

If your installation directory is different, just make the necessary adjustments to the steps below.

Before doing the next step, create first the init file. This will reset the password of the user 'root'.
  1. Go to C:\ drive.
  2. Create the mysql-init.txt file and open it.
  3. Copy and paste the following to the file and save it.

UPDATE mysql.user SET Password=PASSWORD('MyNewPass') WHERE User='root';
FLUSH PRIVILEGES;

Note: Replace MyNewPass with your password.


A. If MySQL is running as a Windows Service:

Stop the service:
  1. Log in as Administrator in the server.
  2. Go to Control Panel > Administrative Tools > Services.
  3. Find the MySQL service and stop it.

Start the service:
  1. Go the Services window again and find MySQL service.
  2. Right click it and select Properties.
  3. Put the following in the Start parameters text box.
    --init-file=C:\\mysql-init.txt
  4. Now, click the Start button. Click OK once the service has started.


B. If MySQL was executed as a process:

Stop mysqld.exe:
  1. Log in as Administrator in the server.
  2. Open the Task Manager.
  3. Go to Processes tab.
  4. Select mysqld.exe and click the End Process button.

Start the mysqld.exe:
  1. Open the C:\Windows\system32 folder.
  2. Find the cmd.exe.
  3. Right click it and select Run as administrator.
  4. Type the following on the command prompt:
    C:\>"C:\Program Files\MySQL\MySQL Server 5.1\bin\mysqld.exe"
    --defaults-file="C:\Program Files\MySQL\MySQL Server 5.1\my.ini"
    --init-file=C:\\mysql-init.txt
  5. Now, click the Start button. Click OK once started.

If you got the error "InnoDB: Operating system error number 5 in a file operation"


you have to give Admin priviledge to mysqld.exe.
  1. Go to MySQL installation directory. In my case C:\Program Files\MySQL\MySQL Server 5.1\bin.
  2. Right click mysqld.exe and click Properties.
  3. Go to Compatibility tab and check out the Run this program as administrator. Click OK.
  4. Try again to start the mysqld.exe with the steps above.

MySQL should be running again. Try to connect using the username 'root' and your new password.

Thursday, July 29, 2010

Using reCaptcha in ASP.Net (with Custom Theme)

reCAPTCHA, now acquired by Google, is a system used by many websites to protect them from bots attempting to access restricted areas. I always found this in registration and inquiry pages.


I personally do not like the looks of its default themes. Applying the custom one I found here is good but the validation is not working. For it to work, there are a lot of solutions out there where they are not using the available reCAPTCHA's ASP.Net API, but requires a lot of coding to work. Here, we will make it simple using the available API to save time.

Note: I am using ASP.Net 3.5. This may also work with 2.0.


Requirements:
  1. API keys. Sign up here to get yours. You will get private and public keys that we will use on the steps below.
  2. reCAPTCHA ASP.NET library. Download it here.
Steps:
  1. Put the library into the Bin folder. Make sure to follow this step so that we can have reference to RecaptchaValidator class.
  2. Copy the below code to your aspx page. Make sure to replace all [YourPublicKey] with your private key.

<script type="text/javascript">
var RecaptchaOptions = {
theme: 'custom'
};
script>

<div id="recaptcha_container">
<p><label for="recaptcha_response_field">Kindly enter the words below:label>
<input type="text" id="recaptcha_response_field" name="recaptcha_response_field" class="text" />p>
<div id="recaptcha_image">div>
<p>Choose captcha format: <a href="javascript:Recaptcha.switch_type('image');">Imagea> or <a href="javascript:Recaptcha.switch_type('audio');">Audioa> p>
<input type="button" id="recaptcha_reload_btn" value="Get new words" onclick="Recaptcha.reload();" />
div>

<script type="text/javascript" src="http://www.google.com/recaptcha/api/challenge?k=[YourPublicKey]">
script>

<noscript>
<iframe src="http://www.google.com/recaptcha/api/noscript?k=[YourPublicKey]"> height="300" width="500" frameborder="0">iframe>
<textarea name="recaptcha_challenge_field" rows="3" cols="40">textarea>
<input type="hidden" name="recaptcha_response_field" value="manual_challenge" />
noscript>
<span style="color:Red;"><asp:Literal ID="ltrWrongCaptcha" runat="server" Text="The words are wrong. Try to input the another words above." Visible="false">asp:Literal>span>
 
Browse the page and you will see the ReCaptcha display same with below:

Note: Validation is not yet working.
3. To validate the input words, go to Submit button’s Click event and place the below code inside it. Make sure to replace the [YourPrivateKey] with your private key.

Dim recaptcha As New Recaptcha.RecaptchaValidator
recaptcha.PrivateKey = "[YourPrivateKey]"
recaptcha.RemoteIP = HttpContext.Current.Request.UserHostName
recaptcha.Response = GetFormValue("recaptcha_response_field")
recaptcha.Challenge = GetFormValue("recaptcha_challenge_field")

Dim result As Recaptcha.RecaptchaResponse = recaptcha.Validate()

If Not result.IsValid Then
'If Not Page.IsValid Then
Dim ltrWrongCaptcha As Literal = FormView1.FindControl("ltrWrongCaptcha")
ltrWrongCaptcha.Visible = True
e.Cancel = True
End If

4. Reload the page and see how the validation works.
That's all!
You can also customize its looks by replacing the Image and Audio links of image buttons.